The results have frankly exceeded my expectations! It's rock-solid, very easy to make at home and setup in the field, and allows quite a long exposures with an ordinary 50mm DSLR lens (I'm using Nikon Nikkor 50mm 1:1.2). The above image is made with the help of the UHC 2" filter just laying over the UV filter on the lens (it's needed for better optical surfaces alignment, as I couldn't just screw it in, but it is slightly larger than 2"). More images are under the cut, just click "more" below.
In a nutshell, the ETX-125 OTA is working as an oversized celestial pole finder and expensive camera counterweight, when the mount is tracking on the wedged tripod in equatorial mode. Sort of a piggy-back mount, but with a twist.

You see the ultimate Wide Field Astrograph on the image above. Yes, just two aluminum square rods (bars) with a single screw in the middle! From the same scrap "magic-set" I've used for my AstroScan Chair mount. What could be simpler? If you cannot find such a bars in the Ace hardware or Home Depot - you can use a bit larger L-shapes or C-shapes with minimal construction adjustments. Oh, and the slant in the cross is not just a perspective distortion. It's precisely aligned to match the ETX-125 fork mount mod depicted below:

The modification consists of two thin threaded rods (something around M3 or M4, I believe) permanently fixed in the holes, drilled in the fork sides from its front side, by two nuts from each side of the fork's shell. The distance from the inside wall of the fork is such that the nut inside is close enough to the removable inner wall so when the fork is re-assembled the wall is preventing nut's rotation.
That is the first thing to do, as any small error here can be amended by drilling and merging the bars later accordingly (thus that little slant in my construction, as I had one hole in my horizontal bar already pre-drilled slightly off-center - no biggy). The vertical location of the holes is dictated by the lower edge of the OTA plastic frame wedge with two mount screw holes (in the center of the image above). One of the bars goes horizontally right below it, so the crossing vertical bar can be secured to these OTA holes without interfering with the horizontal rod, like pictured below:

As soon as the threaded rods on the fork sides are ready the horizontal bar can be marked for them and drilled. The holes must be wide enough to accept them freely, so the nuts on both sides from it can be used to slide the rod back and forward and secure it in the desired position, like pictured:

(The tapered side hole visible on the image was pre-drilled in that piece of scrap aluminum and has no function on this side, on the other side it is pre-drilled at 90 deg, so I had to use it as is off-center). These screws are what making a difference in camera piggy-backing with the flimsy altitude stop vs well fixed and secured with this harness OTA position.
The vertical rod then drilled for the OTA wedge mount holes. Secured in place, marked for the joining screw and drilled. Then the horizontal bar marked to match that hole, drilled, and tapped for the center screw (something like M8 size). Note the protruding down length of the bar and the hole in it, that's for the camera's mount, as I've figured that the lower the center of gravity there - the better for overall stability of the system. But I left the full bar length at the top in case I get any other ideas.
The view from the OTA's top. What we've got here is the simple but monumental camera base and the super precise OTA polar alignment mechanism in one piece:
The view from the OTA's top. What we've got here is the simple but monumental camera base and the super precise OTA polar alignment mechanism in one piece:

The field setup:
- Put the ETX-125 on the equatorial wedge (I have a third party square legs tripod with the adjustable for the latitude top platform made specifically for the ETX-125, but I know such a wedge is available for stock Meade tripods as well. The table tripod (screw in legs) should work as well, I believe);
- remove the top pair of nuts from the threaded rods and screw all the way in the bottom pair (nuts are kept at the top of the rods counter-tightened to minimize the risk of poking something when not in use, i.o.w. that's their "parked position"; if still in doubt, I see it possible to epoxy the nuts inside the fork arms, which should allow unscrewing these rods completely when not in use);
- put the horizontal bar of the cross over the threaded rods, and screw back removed nuts freely (for now, in order to ease overall alignment procedure);
- firmly screw down to the OTA wedge the vertical bar (I'm using ordinary 1/4"x20 slotted screws, not those handled I'm showcasing here, as they have a lower profile, which makes wrench working with my DIY camera mount (see below) easier. I'm thinking of making them flat head one day.
- point the system to Polaris and use the nuts on the rods to fine tune the OTA angle so no matter how you rotate the OTA around the RA axis - the Polaris doesn't move at all (use a high power EP for that). That ensures that your OTA is ideally parallel to your RA axis (assuming the Dec axis is fairly perpendicular by the factory design).
- and finally, the trickiest part: Polar align the OTA using the stock 26mm EP which will produce about 45' FOV, by moving only the tripod mount legs (for a table tripod you can just shim the legs with some magazine pages for example). The trick is to move the Polaris to the edge on the proper side of the EP first. Any Sky Chart application will help you with that (just don't forget that the EP view is upside down and maybe also mirrored left to right! Some apps have an adjustment for that as well); and then move it some more, so the EP is centered on the point opposite to the one where Polaris went out of the FOV. In fact, leaving the Polaris on the side is good enough already for a 50mm lens and exposures up to 5 minutes (maybe more). Or you can try to match the star field around the pole in your EP using that Star Chart app again. The 127mm aperture allows seeing 11-11.5m stars around the pole fairly easily. Such and app usually provides the EP FOV ring as well, so you can polar align even with only 9m stars surrounding the pole matching the view in that ring:
The yellow "smiley" marks 9m stars close to my 26mm EP FOV edge,
which I would use to match the view with DSO Planner Star Chart
(all of the bolder stars are well visible even in my white LPZ - have that confirmed tonight).
The chart is mirrored. Red dash ring is the 45' FOV edge. Red dash line - direction to Polaris - affix your camera tripod head using that mounting hole near the end of the vertical bar with a good bolt/machine screw as necessary (some heads might have a clamping mechanism instead).
Bonus: DIY Pivoting camera mount
I've misplaced my dedicated ballpoint head, but that's for good, as I have ended up rigging a truly sturdy pivoting camera head instead. I had a thick steel shape at hands, a leftover from the z12 transformer cradle project (in fact, that's just a heavy duty door handle for a wooden fence gate, which I've found at the Ace Hardware; it's great for making wide nut fasteners to clamp plywood pieces under the heavy load), so I've cut off the bottom mounting plate and tapped it for 1/4"x20 machine screw (that piece is visible under the bar on the image below). But I don't just tighten the azimuth screw it in, as nuts on both sides are way more reliable clamping mechanism for the task (see the image below). I don't mind using the adjustable wrench to tighten all the nuts super firm, what adds to the stability tremendously, compared to most compact easy release ball mounts I know about, as my compact field toolset is always with me anyway. Though, I might think of adding really large hand nuts similar to some old tripod heads tightening hand grips.For easy camera pointing I'm using the "Minolta two zoom levels, rotating right angle optical viewfinder attachment" - very convenient and fool-proof (visible on the right top). Can't find it online anymore (it's old). But this one is similar.

Actually, making that image, I forgot, that since then I'm using the camera bolt on the lower hole already, in the handle's back (left on the image), which adds even more to the stability of the camera. The pictured top location had to be used initially, as I had that Minolta eyepiece misplaced as well, thus needing a higher camera mount location for easier pointing using the viewfinder or the screen.
Sure thing, feel free to put any camera mount on that frame, just make a proper hole in the bar for it or use a clamp, there are plenty of options for that.
Important note: This (or any other similarly mounted one) simplistic camera mount allows all freedoms of rotation, except the roll, so I can start imaging in any direction, having the camera weight balanced on the top of the OTA in order to minimize the strain on the RA drive. However, it's better to start it slightly to the West, to pre-load the worm drive, known of having a slight play in most ETX mounts. That will effectively prevent the inevitable image shift when the center of gravity moves over the meridian.
Results
It works just great. Packs really small, as you can loosen the center screw and fold bars into a single narrow piece.One more good thing about this astrograph is that your ETX is still fully functional. I'm now having a good reason to take it with me just in case, as I can setup it while dark adapting and do some unattended imaging in parallel, or use it day-time for Sun and terrestrial views, thus maximizing my overall astro-outings outcome.
As promised, some more images on that rig (click to zoom). All of them are a single shot with the unmodified Rebel XSi, and the Nikon Nikkor 50mm 1:1.2 fully open (just tests, actually, I'm yet to dig into the digital AP field). The exposure is 3 minutes. Some are crops. Violet star fringes are due to the visual UHC filter aberration.
 |
| Veil |
 |
| Flame and Triffid |
 |
| Americas and around gamma Cyg |
 |
| Cyg No UHC, 68 sec |
 |
| Sgr, no UHC 30 sec |
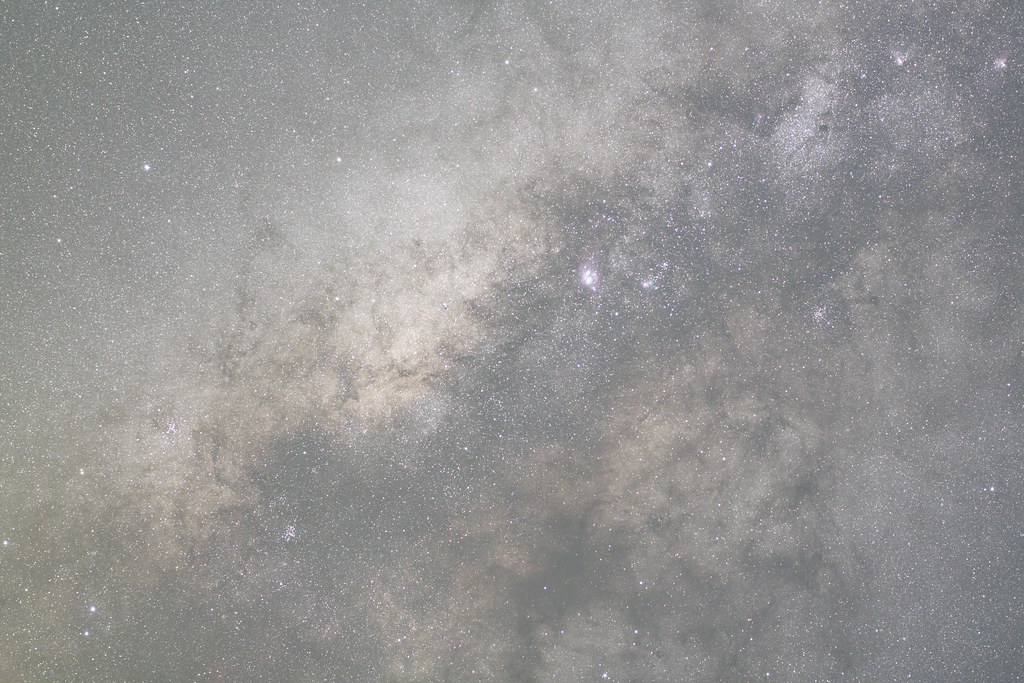 |
| Sgr, 3 min |
 |
| Sgr with UHC, 3 min |
To Do
- Make large hand nuts for the camera mount.
- Try with a larger lens.
- Get into stacking.
- Try longer exposures.
- Investigate the idea of making true polar finder by utilizing the RA ring of the mount and pre-setting the declination of Polaris in some way.
The platform has a really clear and user-friendly design, which makes it great for skilled customers, however particularly for first-time gamblers who have by no means been on such web sites prior to now. Not only will you be able to|be succesful of|have the power to} play a number of|numerous|a selection of} basic roulette variants like American roulette, however additionally, you will get to try distinctive options similar to double ball roulette as well. These video games could be loved for each actual cash and at no cost and what makes this app even higher is that you’ll additionally 파라오카지노 get to try out distinctive roulette challenges. There most likely not|will not be} any unique reload bonuses for crypto players, nevertheless, there are BetOnline promo codes that can be used to claim an unique crypto welcome provide. It presents over 8 roulette video games for cell players to try out together with American roulette and VIP European roulette.
ReplyDelete